Read before Operating - Laser Cutter Quick Start Guide
Turn on the laser cutter by pushing the switch in the back left corner
Launch Inkscape on the computer and import your file.
For a in-depth tutorial on the laser cutter and inkscape software see Laser Cutting
Double check the fill and stroke colours and ensure the black and red areas correlate to etch and cut, respectively.
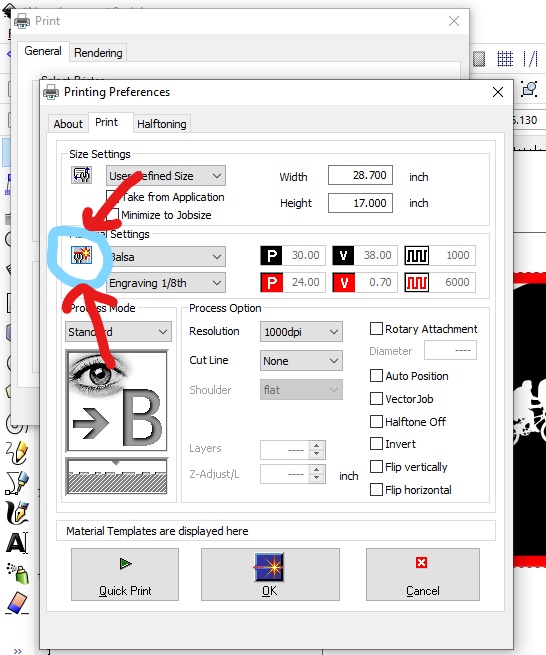
When ready to cut, go to file>print>preferences and select your material. Hit the button highlighted below and make sure the settings allign with the chart Material Cut Parameters
When starting the print make sure the bed is calibrated using the tool as specified in Trotec Launch
Keep the lid shut at all times when the laser is running.
If the material (not the laser) catches on fire it means that you have too much power/current for how fast you are going. When this happens,
Turn off the laser cutter
Contact the SDH or a Faculty Technician for further support
Make a New Material preset and adjust power/current, speed, and PPI/Hz. For information on each parameter see: https://www.troteclaser.com/en-ca/learn-support/helpcenter/laser-parameters-definition
When finished cutting, wait a couple minutes to let the fan suck out the fumes under the lid to avoid inhaling the fumes and causing a smell in the room.
If the smoke is not getting extracted, let one of the SDH staff know. The filter likely needs to be changed.
NOTE: Sometimes you may find that your file will not transfer from InkScape to Trotec Job Control. The printer only has the capacity to transfer a limited amount of data to job control at a time. If you notice your full job doesn’t transfer, break it down into sections and trasnfer them one at a time. Each section moved can then be oriented in Job Control on the laser cutter surface.